Process Monitor
Process Monitor displays instant gauging status and history of gauging, while allowing easy management of re-mastering.
Process Monitor - shop floor process information
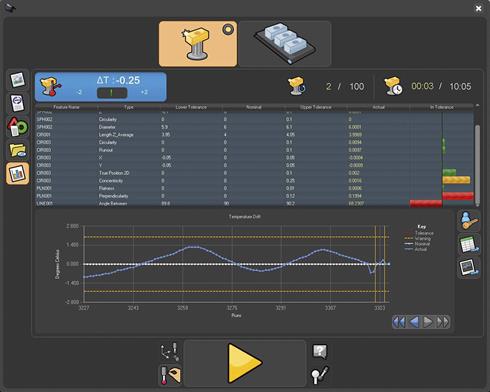
Process Monitor includes an instant status monitor bar graph of the last measured part, historical results for the selected feature, and three status displays allowing management of re-mastering.
The limit for re-mastering can be set on the basis of temperature drift, time since last master, or by number of parts measured, or a combination of these. Process Monitor can then be set to prompt the operator when re-mastering is needed.
The historic data for each feature can also be exported, either as a .csv file or as an image, to enable easy sharing of results.
Temperature drift since last mastering procedure
The temperature icon displays the reading from an Equator system's on-board temperature sensor, showing the change since the last mastering procedure. When it is selected it displays the history of temperature data in the graph area. The system administrator can set the drift limit as required - within this limit the bar is green, outside this limit the bar turns red.
The temperature drift limit will be different for each part, and depends on the tolerances of part features and the part design and material. For example a thin-walled aluminium part will expand and contract differently to a steel part with thick sections. To determine the appropriate drift limit the part program can be set to loop continuously, gauging the same part, while Process Monitor records the change in gauged values of each feature at the same time as the change in temperature. When the gauging data reaches an unacceptable value (often 10% of tolerance) on any feature, this can determine the temperature drift limit.
Status monitor bar graph and feature table
The status monitor bar graph shows results for the last measured part, with the 'In Tolerance' column of the table displaying the proportion of tolerance for each feature on the table. If the value is in tolerance it shows as green, or red for out of tolerance. The administrator can also set upper or lower warning limits - when the value reaches these limits the bar turns orange, allowing the operator to adjust the process before scrap parts are produced.
Each feature has a separate row in the feature table, showing: name, type, lower and upper tolerance limits, nominal and actual values.
As features are selected in the table, the graphical display below shows history of measurement for that feature. The graph also shows upper and lower tolerance limits as defined in the gauging program and any warning limits set by the administrator in Process Monitor.


