Laser encoder improves accuracy of optical connector measurement
Background
Yagishita Giken's YGN-590-MT multi-core optical connector inspection machine sets pre-determined reference values for the type of optical connector under inspection and takes high-accuracy dimensional measurements.
The reproducibility of images taken by the machine's high-resolution camera and optical system depends on a unique image processing algorithm and built-in laser interferometry for assuring the accuracy of machine travel. The machine's XYZ auto-stage and light intensity are controlled by a PC.
The types of optical communication components inspected by the Yagishita Giken machine typically include MT ferrules, MTF fibre assemblies and MPOs. Such components are manufactured at very high tolerances in order to minimise connection losses and to maintain signal integrity.
YGN-590-MT is recognised by manufacturers of optical communication components both inside and outside of Japan as one of the few systems available in the world capable of measuring waveguide pitch deviation and shape at high accuracy, with its special optical system also contributing to an optimisation of magnification.
Challenge
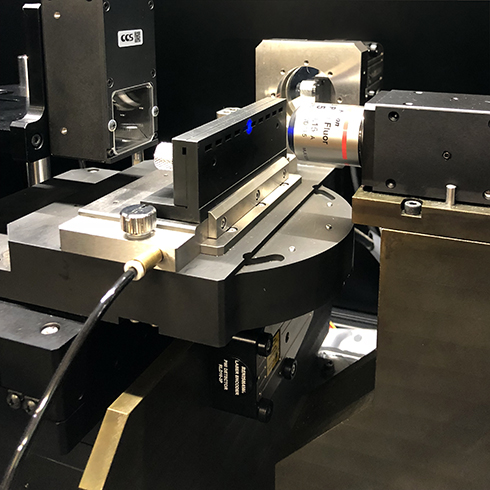
YGN-590-MT is composed of a main unit and a control unit. The main unit is composed of a stand, measurement unit, XYZ auto-stage / workpiece carriage unit, and an observation light unit. The control unit is composed of a host PC unit, PC rack, driver box and a laser encoder.
The stand carries the measurement unit and features damping and continuous-air-supply auto-levelling functions to maintain stability. The measurement unit has a granite base plate to maximise rigidity, reduce vibration and so ensure measurement stability.
On the base plate are mounted the XYZ auto stage, a 0.01 μm resolution laser encoder, a microscope and transmission light unit. A cover over the measurement unit prevents light infiltration from above during auto operation. The travel distance of each axis on the XYZ auto stage is 100 mm for the X-axis, and 4 mm for the Y- and Z-axes.
The machine's encoder-equipped motor helps improve the correlation between driving and actual movement. Each stage has an independent structure arranged in ZYX sequence. Two mirrors used by the laser encoder are installed in the top-most X-axis to detect horizontal travel distance, vertical displacement, and Z-axis movement.
However, the measurement accuracy of the machine's incumbent laser interferometry scheme was limited, making any required improvement in alignment accuracy difficult to attain for future generations of optical communication component.
Solution
Conventional laser interferometry schemes use a laser head, interferometers, reflectors, and detectors, which are all independent from each other. The laser beam is routed between these components by a complicated network of beam splitters and benders. This results in a bulky, complex system which is time consuming and difficult to set up, align and maintain.
By using the innovative Renishaw RLE10 laser encoder such system weaknesses are removed. Its advanced technologies minimise errors from multiple sources and achieve much higher measurement precision.
The RLE10 uses an optical fibre to deliver the laser beam directly to remote launch units which also contain all necessary interferometry optics and the interference fringe detector. The approach minimises both system complexity and integration time.
Since the wavelength used in laser interferometry is a determinant of the measurement resolution achieved, the RLE10's 633 nm operating wavelength means it can achieve an inherently higher resolution with the minimum sub-divisional or interpolation error.

Result
Integration of the Renishaw RLE10 laser encoder has enhanced machine alignment, installation and system stability. The positional accuracy of the YGN-590-MT multi-core optical connector inspection machine has been dramatically improved as a result, from 0.1 μm to 0.01 μm resolution.
About Yagishita Giken
Yagishita Giken, Japan, has produced automation equipment for more than 40 years. Based on its own technology, the company offers consistent total engineering solutions comprising design, development, control and manufacture. Its image inspection and general inspection machines are highly regarded by optical communication component manufacturers inside and outside of Japan.

