No momento esta página não está disponível em seu idioma. Você pode ver uma tradução automatizada utilizando o Google Translate. Não somos responsáveis pelo fornecimento deste serviço e não podemos verificar os resultados.
Se você necessitar mais ajuda fale conosco.
CMM retrofit reduces cycle time by 60%
After losing its 3-axis co-ordinate measuring machine (CMM) to a devastating flood, Precision Machine & Auto Components (PMAC) had to act fast to find an alternative solution. Renishaw's REVO® 5-axis measurement system not only helped return a water-damaged CMM to operation, it also reduced cycle times by 55%.
Background
Founded in 1974, PMAC is regarded as one of India's most respected and trusted manufacturers of large, high quality mechanical components. It operates 35 CNC machines at two factory sites in Chennai, India and employs more than 350 people.
Serving seven major industrial sectors, PMAC works with market-leading OEMs in the USA, Europe, the Middle East and throughout India. Its diverse manufacturing output includes transmission cases, gearboxes, cylinder blocks, knuckle joints, valves and compressors.
Quality has always been a fundamental cornerstone of all PMAC operations. Its precision manufacturing processes and procedures comply with recognised national and international standards.
Importantly, PMAC's product quality inspection facilities are all in-house and feature state-of-the-art equipment staffed by an expert quality management team.

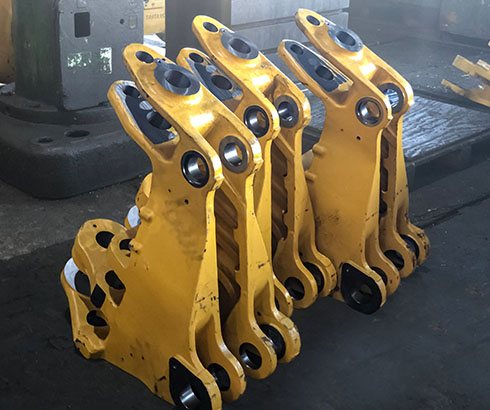
Swing frame components used in the earth-moving industry
Challenge
Located in Chennai, the capital of India's southern Tamil Nadu state, PMAC's manufacturing base is in an area that is no stranger to heavy rains and cyclonic storms. The north-east monsoon brings intense rain to the region during October and November.
Relentless rainfall caused widespread flooding in Chennai. Rivers burst their banks and PMAC, like many other businesses in the surrounding area, was unable to escape the devastating effects. One of its two factories, which houses its CMM facility, was severely flooded. The company's CMM, while rendered inoperable due to water damage, still had an operational frame and could be salvaged.
The strategic importance of the company's quality inspection facilities demanded swift action. Many of the components produced by PMAC, such as locomotive parts, were subject to 100% CMM inspection. A practical solution was needed fast.
PMAC's Executive Director, Mr Karthik requested the immediate replacement of the damaged CMM with a brand new upgraded version of the existing 3-axis machine.
At the same time, Mr Karthik saw an opportunity to double the company's CMM capacity by repairing the damaged CMM. However, a system retrofit by the original supplier for the salvaged CMM frame was too costly, at almost 70% of the cost of a new machine.
Retrofitting with the REVO 5-axis measurement system has greatly enhanced our quality inspection capabilities, reduced downtime, increased throughput and greatly simplified operations – for us it's been a real game changer and is definitely worth the investment.
PMAC (India)

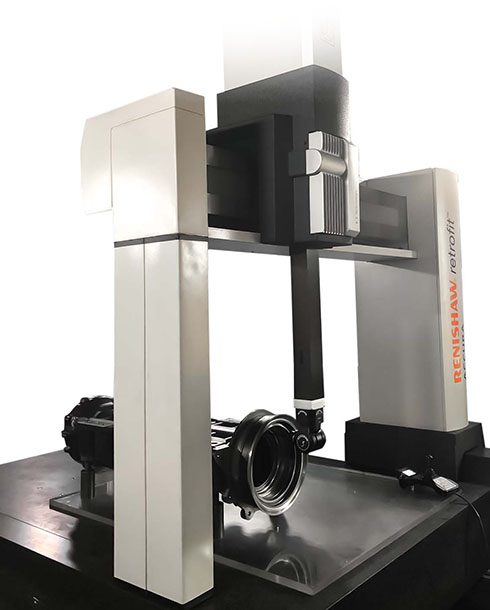
REVO measuring a cannon tube used in the locomotive industry
Solution
At a meeting with Renishaw during the IMTEX exhibition, Mr Karthik was introduced to the REVO 5-axis measurement system and the idea of using it to retrofit the water damaged CMM machine.
After deciding to purchase a complete REVO 5-axis measurement system from Renishaw, PMAC's CMM was retrofitted within just six weeks from order placement. The 5-axis measurement technology embedded in Renishaw's UCC S5 CMM controller lies at the heart of the retrofit for PMAC, synchronising the 3-axes of the CMM with the two additional rotary axes of the REVO-2 probe head.
By programming the REVO-2 head to perform the fastest acceleration and deceleration motion during the inspection process whilst leaving the CMM to move in a slower linear fashion, the REVO 5-axis system minimises dynamic deflections and inertia loads on PMAC's machine frame.
Unlike alternative systems based around indexing heads or fixed probes, the 5-axis motion enables the stylus to follow a continuous path around even the largest and most complex features, without having to leave the surface to change stylus or re-index the head.
Using the RSP2 probe for scanning and touch-trigger measurement, fitted with RSH350 and RSH500 extended-reach stylus holders, the refurbished CMM system was able to meet all PMAC's inspection requirements.
Results
| Part description | 3-axis CMM cycle times | REVO 5-axis CMM retrofit cycle times | Cycle time saving % |
| Piston slide | 15 mins | 9 mins | 40% |
| Cannon tube | 65 mins | 35 mins | 46% |
| End platen 150 | 55 mins | 30 mins | 45% |
| Centre housing | 30 mins | 17 mins | 43% |
| Slider frame | 45 mins | 20 mins | 55% |
| Swing frame | 35 mins | 18 mins | 48% |
Comparing 5-axis and 3-axis inspection performance
By comparing the performance of the 5-axis Renishaw CMM retrofit with that of the brand new 3-axis CMM for a range of different PMAC parts, it was determined that the cycle time saving of the 5-axis system was, on average, 46% and sometimes as much as 55%.
Importantly, the ability of the 5-axis CMM system to access and inspect all critical features on very complex parts has also helped PMAC alleviate some significant manual handling and health and safety challenges.
With a large number of finished parts weighing hundreds of kilograms each, the previous 3-axis CMM required frequent manual intervention and the use of a large gantry crane to move the parts in order to complete inspection processes. With the 5-axis solution this is no longer the case. The REVO 5-axis system can also handle a complete part inspection using just one or two styli, which has greatly simplified operations, with the need to only calibrate once.
Finally, since the CMM workload is high and continuous, carrying out software configuration and modifications online for the 3-axis machine was an unavoidable cause of delay in production throughput. The REVO 5-axis system doesn't suffer from the same problem. With its MODUS™ metrology software, programming is done offline, so there isn't any downtime.
The retrofitted CMM was constantly monitored for the first month of operation and no errors in performance were detected. A year later, during the CMM's annual maintenance check, it was confirmed that the machine had run flawlessly.
Using the REVO system to refurbish the damaged CMM and with the added benefits of 5-axis measurement, PMAC has achieved a dramatic increase in inspection process efficiency that has both removed a previous bottleneck in production and enhanced the quality of inspection.

