Ta strona nie jest obecnie dostępna w Twoim języku. Możesz zapoznać się z tłumaczeniem automatycznym, korzystając z usługi Google Translate. Nie jesteśmy odpowiedzialni za świadczenie tej usługi, ani też wyniki tłumaczenia nie były przez nas sprawdzane.
Jeżeli chciałbyś uzyskać więcej pomocy skontaktuj się z nami.
Intoco: Renishaw probing reduces scrap and saves time at precision subcontractor
The advanced manufacturing division of Intoco (Independent Tool Consultants Ltd) a Gloucestershire, UK, based company, is a showcase for precision subcontract engineering. Five-axis simultaneous machining centres and 3D solid modelling capabilities are supplemented by an unerring commitment to quality control, with three of the company's high-specification CNC machine tools being fitted with touch probe technology from Renishaw.
Background
Whilst efficient and economical productivity is a major factor behind the success of most sub-contract machine shops, quality is of paramount importance in a market place where “right-first-time”, with zero scrap allowance is critical. After all, rejected components mean unpaid invoices.
The target then, was to build measured accuracy into and during the manufacturing process. Machine shops that fit CNC machines with measurement probes quickly realise the benefits derived from automated tool setting, broken tool detection, component setting, in cycle gauging and first-off inspection. Intoco, based in Staverton near Cheltenham, UK, is a prime example of a subcontract manufacturer taking advantage of the touch probe technologies available from Renishaw.
Managing Director Tony Preece founded Intoco in 1972. Originally serving the aluminium extrusion industry, the company has evolved to serve a variety of markets that demand high quality products, fast delivery times and price competitiveness.
Intoco is particularly responsive to very short lead-times, partly because the company also has a special steels and alloys division, which means it has stocks of raw material on site ready for component machining. Tony states that the fastest return on any investment that Intoco has made has been the Renishaw probing.
Rapid turnaround
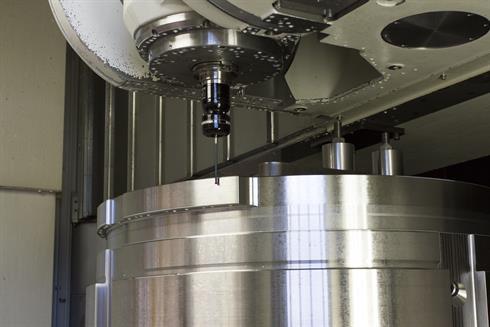
As with all manufacturing companies, time spent setting work piece positions and inspecting finished products manually could be better invested in machining. A probing system can eliminate costly machine downtime and the scrapping of components associated with manual setting and inspection. This was first appreciated at Intoco around seven years ago when the company invested in a Mazak Integrex e-1850V - a machine so large it arrived in kit form in about 30 crates and at the time the only one in the UK. It came fitted with a Renishaw RMP600 touch probe, a factor which opened the company's eyes to the competitive gains on offer.
“Currently the metals extrusion industry commands 50% of our production capacity, but we also manufacture components for the oil and gas, green energy and pharmaceutical industries”, says Wayne Parkins, Intoco's CNC Production Development Engineer. “We purchased the Mazak Integrex e-1850V to machine very large critical components up to 2300 mm in diameter and 1500 mm in height, manufactured in Alloy C22, super duplex and high alloy pre-hardened tool steels. With our clients not allowing any possibility of 'weld repair' in the event of a mistake 'right first time' on 1 off components is critical with no margin for error. This was the reason for the integration of the Renishaw inspection probing on our Mazak Integrex e-1850V.”
Inspection Plus
The Mazak INTEGREX e-1850V at Intoco also has Renishaw's Inspection Plus software for machining centres installed. This is an integrated package of macro software which includes vector and angle measuring options, print options and an extended range of cycles, as well as an SPC cycle, one-touch or two-touch probing options, tool offset compensation by percentage of measured error, and data output.
“Inspection Plus is great because you can do in-process measuring and adjust tool sizes automatically with the controller, so from a measurement perspective it takes a lot of problems away from the operators”, explains Mr Parkins. “We've got a CMM which will accommodate 800 mm on the X-axis, but when we get components over that size, we can't measure them as accurately as we need to. The Renishaw probing system and software are essential.”
Intoco also machines 1500 mm diameter turbo fans on the same machine, where once again Inspection Plus is highly valuable: “We measure the fans using Inspection Plus and export the data to a suitable file, such as a Word document or an Excel spreadsheet,” says Mr. Parkins. “We can then present a document to the customer showing nominal size, check size and tolerance band.”
More investment
Recently Intoco has added further Mazak multitasking machines to its production facility, including a Mazak Integrex e-650H, which machines components for extrusion presses, pharmaceutical and defence processes. A typical batch size at Intoco is one to four, with ten being the maximum.
Mr. Parkins explains: “originally the Mazak Integrex e-650H was delivered without a Renishaw touch probe. However, we required it to machine components up to 1000 mm diameter, which were difficult to measure with conventional inspection equipment. We then contracted Renishaw to fit a touch probe with a radio signal transmission to enable Intoco to inspect and record tight tolerance dimensions”.
Intoco now also has a smaller capacity Mazak Integrex e-420H, fitted with Renishaw touch probe technology and it also uses a Renishaw MH20i manually adjustable probe with a TP20 touch trigger probe on its co-ordinate measuring machine.
“The biggest challenge for us is the demand for very fast and critically urgent delivery of components to our clients”, says Mr. Parkins. “The elimination of the 'off machine' inspection process and manual measuring, with the potential for inaccuracy and misreading that can occur, coupled with the length of time that this entails and the machine delays involved, gives us an improved 'floor-to-floor' time together with printed accurate measurement data to pass to our clients.”


