Stran trenutno ni na voljo v vašem jeziku. Lahko si ogledate strojni prevod, ustvarjen s storitvijo Google Translate. Te storitve ne zagotavljamo mi in rezultatov prevoda nismo preverili.
Za dodatno pomoč se lahko obrnete na nas.
Laser interferometry assures spherical lens quality
Spherical optical lenses are a critical component in a wide range of high-resolution industrial and scientific research applications, from imaging systems in the aerospace sector to mask alignment in semiconductor manufacturing.
Ensuring the complete accuracy of spherical lens geometries is vital in assuring any system's image processing quality, with even the slightest error in lens manufacture having a profound impact on system reliability and performance.
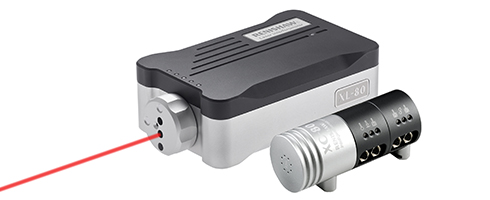
Beijing Institute of Technology (BIT), China, has used Renishaw's XL-80 laser interferometer to develop a high precision instrument capable of simultaneously and reliably measuring all the key dimensional parameters of a spherical lens.

Background
Founded as a public university of science and technology in 1940, BIT today sits proudly in the top 1% of the Essential Science Indicators (ESI) global rankings in five different disciplines: chemistry, engineering, material science, mathematics and physics.
As a part of its on-going research into spherical lens parameter measurement, BIT's School of Optoelectronics recognised a fundamental need to dramatically increase the efficiency and capability of existing instrumentation.
While industry had already developed a variety of methods of measuring spherical lens parameters, they required the use of multiple instruments. In many sectors measurement technologies, for example surface shape measurement, though very mature, still lacked precision.
BIT therefore embarked on a program to design and develop a differential confocal laser interferometry-based instrument that would successfully address the weaknesses and deficiencies of existing measurement solutions. A crucial enabling technology at the heart of BIT's radical new instrument was Renishaw's XL-80 laser interferometer.
Dr Weiqian Zhao, Professor at BIT's School of Optoelectronics said, “Our technical focus was on combining differential confocal measurement technology with surface shape interferometry technology to create an integrated system capable of performing a complete set of synthetic parameter measurements on all kinds of spherical lens.”
Beijing Institute of Technology (China)
Complex set of measurements
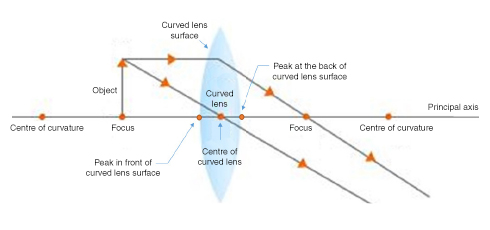
The accurate inspection and verification of any convex (converging) or concave (diverging) spherical lens demands a complex set of measurements to be made. These include: lens surface shape, curvature radius, focal length, refractivity, thickness and axial gap.
The development of an instrumentation system architecture flexible enough to enable the high precision measurement of every one of these spherical lens parameters set a very clear challenge for BIT.
And while a wide choice of alternative laser interferometry solutions could deliver the measurement precision, not all could provide the assured stability and reliability demanded by repeated lens inspections. Verification of laser interferometer performance was required.At the same time, BIT's instrument would also aim to minimise the amount of manual handling and setup time required by each lens for each successive parameter measurement. Finally, instrument compatibility with clients' systems provided some further essential design criteria, ensuring transparent access to interferometry measurement data.

Differential confocal principles
BIT's differential confocal laser interferometer harnesses the light intensity response signal curve properties of differential confocal principles. This is used to precisely locate the target lens and implement high precision measurements of curvature radius, focal length, refractivity, thickness and axial gap. The principles of multi-step phase-shifting interferometry are also employed to carry out the surface shape measurements.
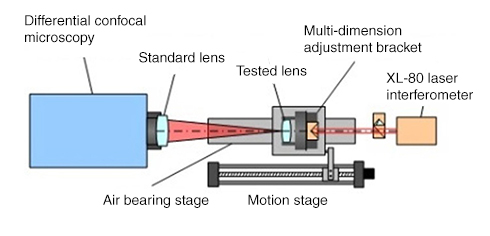
With most of the key components developed in-house at BIT, the instrument's system architecture essentially consists of: a main differential confocal unit (including differential confocal optical path); a standard lens; aerostatic slideway; multi-dimensional adjustment stage; electromechanical movement platform and the Renishaw XL-80 laser interferometer.
Dr Zhao explained the instrument's operation, “The main differential confocal unit fires a measuring beam at the target lens and concentrates it at the focal point of the standard lens; the target lens is mounted on the aerostatic slideway using a multidimensional adjustment stage; the electromechanical movement platform moves the adjustment stage along the optical axis of the target lens.
“When the measuring beam's convergent point overlaps with the front vertex or rear vertex of the target lens surface, the beam is reflected back along the path by the surface of the measured lens for data analysis, while a length measurement laser interferometer simultaneously captures instant position coordinate data for the target lens.”
He added, “We chose the XL-80 from Renishaw as it is one of the very few laser interferometers capable of providing the precision we needed along with assured stability and reliability.”
The measurement principles employed by BIT for typical spherical lens parameters are explained below:
- Focal length - pinpoint the focal length of the target lens, measure the distance between the focal point of the lens and the rear vertex.
- Surface shape - the interferometry system integrates reference beam phase-shifting to measure the interference patterns formed by the light reflected back from multiple measured elements and the reference beam, and uses a phase-shifting algorithm to process the interference pattern and ascertain the surface shape of the lens.
- Curvature radius - pinpoint the vertex and sphere centre of the measured spherical surface and calculate the distance between the two points.
- Thickness/refractivity - pinpoint the point of intersection between the front surface and the optical axis of the target lens, the point of intersection between the rear surface and the optical axis, and the position of the target lens when the lens for measurement is both present and absent. Then use the position of the measuring lens and the previously measured curvature radius, focal length and pupil size of the measuring lens to perform facet-ray tracing calculations on the two spherical surfaces of the measured lens and the reference reflector, and thereby implement high-precision measurements of the refractivity and thickness of the measured lens.
- Axial gap - pinpoint the vertex of each lens, then combine with the numerical aperture of the measuring beam, the curvature radius of each surface in the measured lens group and the refractivity of each lens, and use the ray tracing method to obtain the axial gap between each transparent surface.
Increase measurement efficiency
With its unique ability to simultaneously measure all key parameters of a spherical lens, BIT's differential confocal laser interferometer is enabling users to significantly reduce expenditure on equipment by replacing several different instruments with just one.
Its all-in-one instrument design and innovative lens mounting system means that users are also able to dramatically reduce set-up time and so increase measurement efficiency, by eliminating the need to disassemble the target lens and readjust the optical path for each new parameter measurement.
Importantly, the inclusion of the XL-80 laser interferometer ensures excellent system compatibility. During the software development process, BIT engineers were able to use XL-80's dedicated dynamic link library within their programming, enabling real-time laser interferometry data to be easily integrated with client systems.
Dr Zhao said, “Renishaw provides a range of laser interferometry analysis software offering some really powerful functionality. This functionality though also enables us to perfectly integrate real-time measurement data into our own proprietary analysis software, providing us with even greater flexibility when we are developing customised instruments for clients.”He continued, “We also like to work closely with our suppliers during the system integration and commissioning process, and we have found Renishaw's after-sales service to be impeccable. Their engineers are very willing to take the time to discuss technical issues with us and offer valuable, expert advice.”


