Al momento, questa pagina non è disponibile nella lingua scelta. È possibile visualizzare una traduzione automatica realizzata con Google Translate. Renishaw declina qualsiasi responsabilità relativa alla fornitura di tale servizio e specifica di non avere controllato la traduzione.
È possibile contattarci per richiedere ulteriore assistenza.
TURBOCAM 'high fives' revolutionary five-axis CMM measurement technology
Leader in five-axis turbomachinery production quickly adopts new five-axis Renishaw inspection system, gains faster throughput, greater CMM utilization, and programming reductions from days to hours.
Constantly changing surface geometries, pin-wheeling shapes and tight, intricate features make turbomachinery components — impellers, blades and blisks — some of industry's most complex and exacting shapes. TURBOCAM International achieved leadership in this specialized field by mastery of five-axis machining and five-axis programming software. However, efficient inspection of ever increasing numbers of complex parts was frustrated by slow, tedious, stop-and-go measurement inspection on a legacy 3+2 axis coordinate measuring machine (CMM).
Changing 3-D part geometries required many different probe orientations, plus frequent stylus and tip changes for difficult to reach features, explains Dave Romaine, Quality Assurance Manager. "We would have to stop the CMM and calibrate each re-orientation of the probe. That was compounded as we inspected multiple blades around a part."
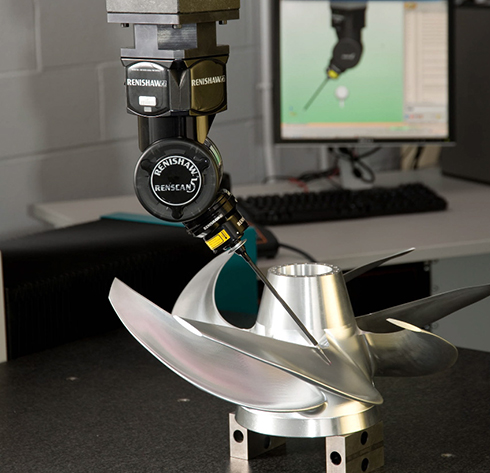
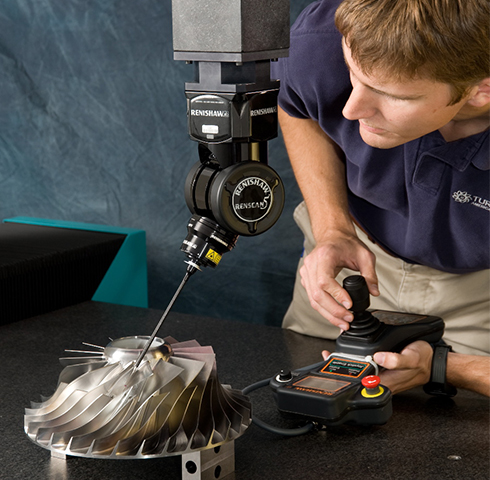
As five-axis experts, TURBOCAM staff were quick to see the potential of a revolutionary scanning system from Renishaw that makes possible automated, programmable five-axis measurement at speeds and accuracies never before possible by CMMs. The Renscan5™ scanning system offered the capability for continuous five-axis interpolated motion, comparable to TURBOCAM's five-axis machine tools.
In January 2007 TURBOCAM became one of the first adopters of the new Renscan5 continuous five-axis inspection capability. Installed on a new Wenzel LH8.10.7 bridge-type CMM at the company's Dover, New Hampshire, USA plant, Renscan5™ transformed part measurement and inspection from a bottleneck to an enabler.
CMM measurement times reduced by at least 50%
High-speed continuous probing routines are reducing programming time, set-up time and measurement time by 50 percent and more. Besides faster throughput, Renscan5 time-savings allows the taking of many more data points for greater measurement precision and frees up CMM time for qualification of turned blanks and in-process checks before final machining passes.
Those powerful advantages led TURBOCAM in early 2008 to become the first company worldwide to add a second Renscan5 CMM, a larger Wenzel LH10.12.8, this time at a new facility in nearby Barrington. In this new facility, Renscan5 is an "essential resource" says Romaine, that is being developed to support higher-throughput production generated by around-the-clock, reduced-staff manufacturing.
XSpect Solutions, now part of Wenzel, did the installation of Renscan5 on both the new CMMs.
TURBOCAM is a preferred supplier of both production and prototype bladed parts to aerospace, automotive and industrial turbomachinery OEMs. CMM inspection assures that critical parts for turbochargers, jet engines, compressors and gas turbines meet demanding accuracy specifications. Part precision and uniformity are critical in providing dynamic balance, directed airflow and long, reliable service at high rotational speeds.

High speed measurement
Renscan5 uses two patented hardware breakthroughs to speed part checking, generate more data points for analyzing part form, and increase available CMM run time:
"Active" probe head
Named REVO™, a powered head provides infinite positioning capability between simultaneous coordinated motion in vertical and horizontal rotary axes. This allows the low-mass two-axis head, a 3-D measuring device in its own right, to perform most of the motion during inspection routines. Infinite positioning allows continuous motion, optimizes part access, and delivers high accuracy part measurements. The active head avoids dynamic errors caused in rapid acceleration/deceleration of the larger mass of a CMM structure. Low-mass, low-inertia design allows Renscan5 to measure at up to 500 mm/sec vs. conventional CMM scanning that is typically limited to 5-15 mm/sec to avoid dynamic errors.
REVO repositions continuously on the fly, simultaneous with measurement, unlike indexing heads which first must be locked into position, after which the CMM provides the measuring motion. On complex parts, says Romaine, "Hundreds of calibrations have now been eliminated, saving us hours of calibration time."
Renscan5 allows the CMM's three-axis platform to be used primarily to "rapid" the REVO head into position for measurement. Where CMM motion is required for a measurement routine, it can usually be limited to a single linear axis and performed at constant velocity, minimizing dynamic effects on accuracy from acc/dec and inertia.
Laser-corrected probing
REVO employs industry's first laser-corrected "Tip Sense" probing. A laser mounted within the head sends its beam down a hollow stylus to a reflector at the tip. The return beam is received by a position sensor and any deflection is used to calculate true tip position. This allows REVO to perform a complete part inspection routine in a continuous operation without recalibration or stylus changes. "Only one probe is typically used to measure an entire part with no tip change time," says Romaine. Tip Sense probes deliver 1 micron accuracy at 250 mm from the axis of rotation. Sizes are available providing probe reach to 500 mm.
While the previous 3+2 axis CMM at TURBOCAM provided a two-axis head, vertical changes in probe angle could only be made in 2.5 degree increments, then calibrated and fixed at the position for measuring. "As we inspected more blades around a part, such as a blisk, it would obviously require more and more probe orientations and calibration. Programming, access, stylus change, and calibration were incredibly painful," notes Romaine.
Thousands of data points
TURBOCAM uses Renscan5 for both point-to-point probing to verify feature location and size and for contact scanning of part surfaces for shape and form data. "On point to point we are able to gather more data simply because the head can orient to any angle and it's a very simple set-up to get more points," says Romaine.
Renscan5 high-speed scanning greatly increases data points. "Previously we might collect 50 or 100 points spaced over a blade," he says. "Now we can collect hundreds or thousands of points with a scan." In scanning mode, the probe moves continuously, adjusting to programmed changes in part geometry. REVO gives TURBOCAM up to 4000 points/sec in scanning mode.
"Increased point data allows us to see a more complete picture of what we're manufacturing," says Romaine. "We can see deviations better as they increase and decrease along a blade or around a part. This lets us better trouble-shoot our manufacturing process." As example, he notes that TURBOCAM has been able to detect tooling breakdowns based on Renscan5 surfacing data.
Helping to reduce measurement time for higher utilization, the Renscan5 system includes a UCC2 universal CMM controller with patented MoveScan™ software that synchronizes, smoothes and speeds motion between the CMM and the REVO head. MoveScan drives the probe to the surface of the part in the shortest distance by looking ahead to go-to points and blending moves into smooth, continuous motion.
Drastically reduced CMM programming times
Parts inspected on the CMMs range from small impellers just 2" in diameter to 36" diameter, multi-vane components. TURBOCAM produces more than 400 different bladed part designs a year for compressor, turbine and pump OEMs.
"Just as important as the inspection advantages," stresses Romaine, “are the programming benefits. This has been exciting. We've been able to apply our five-axis machine tool programming methods to drastically reduce programming time for five-axis inspection. This is only possible because of the infinite indexing of REVO and its programmability through the I++ DME protocol."
Renscan5's I++ interface gives the UCC2 controller cross-platform compatibility with measurement software packages and maintains user choice of CMM and software. On complex parts such as blisks (integral hub and blades machined from a monolithic blank), notes Romaine, "What used to take three days to program now takes three hours. The biggest time savings have come in programming and set-up, even more than run time."
The ability to apply five-axis programming expertise makes it much easier and faster to provide programs for part inspection, increasing machine utilization for a wide range of parts, he says. While Renscan5 integration is still evolving, he estimates the CMM utilization has already increased between 30 and 50 percent.
About TURBOCAM
TURBOCAM has manufacturing operations in the U.S., England and India and is certified to ISO 900l:2000 and other quality standards in those operations. It brings comprehensive partnering resources to prototype and development work, offering world-class capabilities in five-axis machining, metallurgy, aerodynamics, geometric modeling and analysis, and software — and now five-axis part quality inspection and documentation.
The Barrington TURBOCAM plant was created for round-the-clock unmanned manufacturing of large numbers of bladed parts for a variety of applications such as air compressors, gas expanders, air cycle machines, jet engines, turbine driven power sources, and even artificial hearts. TURBOCAM Automated Production Systems (TAPS) specializes in meeting market demand for impellers and blisks machined from wrought aluminium, stainless steel and titanium alloys, enabling higher performance and reliability than cast components. TURBOCAM offers production capacity for 250,000 to 300,000 impellers a year (which includes high volume manufacturing of turbocharger impellers for the automotive industry in the TAPS division).
