Cette page n'est pas disponible actuellement dans votre langue. Vous pouvez en afficher une traduction automatique avec l'outil Google Translate. Cependant nous déclinons toute responsabilité quant à ce service et nous ne contrôlons pas les résultats de la traduction.
Pour en savoir plus à ce sujet, contactez-nous.
Perfect fit castings for Ricardo
Tridan Engineering based in Clacton-on-Sea is using Renishaw machine tool probes to align complex castings as part of a motorsport machining contract for Ricardo. For the first batch of parts, a project that would normally have taken around two months, was compressed into a 17-day turnaround without any compromise in the quality standards demanded by the client.
Background
Tridan Engineering, which is part of the Langham Industries Group, was established in 1968 to provide a total outsourcing partnership and machining service to customers around the world. The company currently employs around 60 staff and is approved to both AS9100 and ISO14001. Sectors served include aerospace, defence, automotive, motorsport, medical and marine.
Tridan's machine shop, covering sliding-head, CNC turning, grinding and its own jig and tooling department, also houses 14 CNC machining centres, including Mazak Variaxis i-600 five-axis and HCN500 horizontal models. The latter are mostly of twin-pallet configuration with up to 80-station tooling carousels.

Challenge
“Ricardo Performance Products were having problems in the testing of a rear axle for a rally car that we had manufactured on previous occasions,” explained Paul Coupland, Machine Shop Manager at Tridan. “The issue was one of design/ strength, so they needed a new ‘beefed-up' axle to test. A project like this would normally take 8-10 weeks as we would arrange meetings with the customer, offer design-formanufacture recommendations to help remove cost, prepare tooling and so on. However, we were given just 17 days in order to meet a date slot that had already been booked at the test house.”
Two complex castings make up the rear axle assembly – a cover and a main case. For the main case, the first two operations are performed on a Mazak horizontal machining centre. The part is then transferred to a five-axis machining centre for a single operation, before returning to the horizontal machine for finishing.The cover is machined complete on a five-axis machining centre over three operations.
Accuracy is the main reason we use Renishaw technology. I don't think we could do half of what we do without their probes.
Tridan Engineering (UK)
Solution
“On our five-axis machines we use Renishaw RMP600 high-precision probes, which enable us to balance the cover castings accurately on the first operation,” said Paul Coupland. “That way, we can guarantee to Ricardo that the holes and features are where they need them to be. Similarly, on the horizontals we use Renishaw OMP60 probes, which are again used for balancing the main case castings on the first operation to ensure we supply good parts to the customer. This proved vital for the first batch as Ricardo had precious little time between assembly and delivery to the test facility. There was no margin for problems or delays at the assembly stage – the parts had to fit, first time.”
When machining a casting it is imperative to create a datum or some other point from which to work. By setting the position and alignment of the casting using Renishaw machine tool probe technology, Tridan ensures that the machining process automatically adapts to any variation in stock condition. Here, the work co-ordinate system is automatically aligned correctly to each part. Optimal part set-up guarantees that no shortage of material (undercut) will occur during machining. To use the words of Paul Coupland: “The ‘meat' of the casting has to be in the right place.”
The process requires a measurement dataset of the blank casting to be aligned to the position and orientation of datum and machined features, which is where the Renishaw probes come into play. Probing is an established best practice for maximising the efficiency, quality, capability and accuracy of machine tools. Standard routines built into modern CNC controls simplify the integration of probing cycles into machining operations.
After seperate machining of the cover and main case components, the two parts are bolted together and machined as an assembly on Tridan's horizontal machining centres.
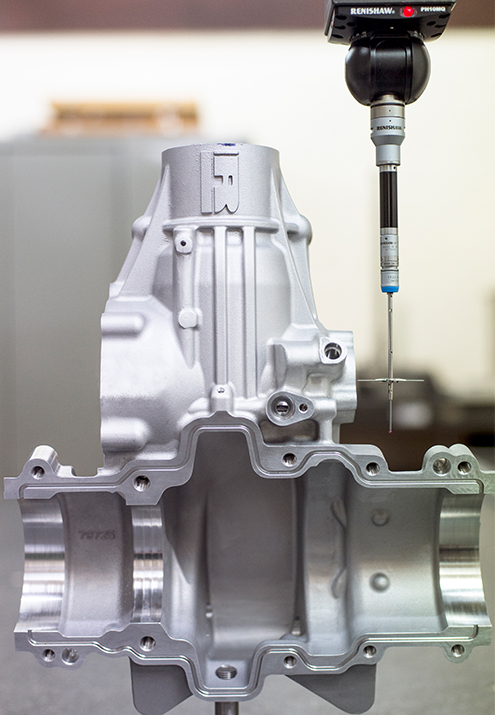
They are then separated and kept in pairs, before tooling holes are machined as the final operation, again on a horizontal machine. But the work doesn't end there. “With every batch of castings machined for Ricardo we have to supply a FAIR (first article inspection report), detailing all critical dimensions on the part,” said Paul Coupland. “For this we use our co-ordinate measuring machine (CMM) with Renishaw PH10MQ probe head to deliver complete peace of mind for both ourselves and the customer. We use various attachments with the PH10MQ, including the Renishaw TP20 kinematic touch trigger probe.”
The Renishaw probe on the CMM allows Tridan to access the internal recesses and awkward features on the castings. This CMM is also used to perform first-off inspection for machined castings, although some features are checked using Tridan's manual CMM using a Renishaw MH20i probe head with various attachments. “Accuracy is the main reason we use Renishaw technology,” stated Paul Coupland. “I don't think we could do half of what we do without their probes. Furthermore, as a company Renishaw is very supportive, although to be honest we've never had to call on their service department – the products simply don't go wrong.”

As a company, Renishaw is very supportive, although to be honest we've never had to call on their service department - the products simply don't go wrong.
Tridan Engineering (UK)
Results
The ability to align the castings accurately and efficiently using Renishaw machine tool probes and perform dimensional checks using Renishaw CMM probe technology meant that Tridan could give its customer a quality product in the short timeframe specified.
“Without doubt, speed and efficiency is the major benefit,” concluded Paul Coupland. “Considering the complexity of the parts, we would probably have been looking at 2-3 days if we had to measure them manually due to the amount of features to be checked. Furthermore, the tolerances involved would make manual measurement almost impossible.”
By Tridan working closely with Ricardo and operating 24 hours a day, seven days a week, a very pleased customer was able to collect the successfully machined new axle castings at 10:00 am on the day prior to the scheduled test.


