Navigation
Aligning the head
AM1 adjustment module
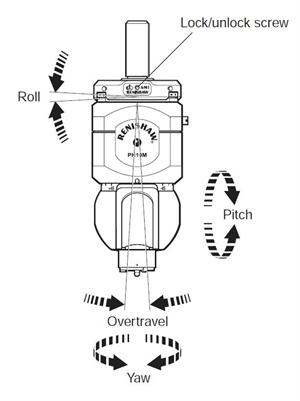
The AM1 adjustment module is designed to provide quick and accurate angular alignment of the PH6M or PH10M PLUS motorised probe heads with the axes of the CMM and the Renishaw autochange rack.
In addition, the quick release mechanism allows the probe heads to be removed for storage and replaced without further alignment. In-built overtravel protection minimises the risk of probe head damage.
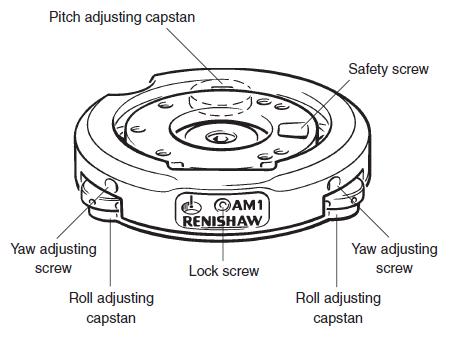
Adjust the AM1 in the order given:
1 Roll adjustment
Rotate the roll adjusting capstans equally and in opposite directions (i.e. rotate one capstan clockwise and the other anti-clockwise).
2 Pitch adjustment
Rotate the pitch adjusting capstan to increase or decrease the pitch.
3 Yaw adjustment
Release the lock screw. Rotate the yaw adjusting screws equally in opposite directions to provide the required yaw. Tighten the screws against each other without applying excessive torque. Tighten the lock screw.
CAUTION: Quick release is only possible if the lock screw is omitted.
Release the lock screw.
Retract ONE yaw adjusting screw.
NOTE: If repeatability of position is required on re-attachment, DO NOT alter the other screw. This repeatability of position is normally sufficient for alignment with the autochange rack, but probes must be re-qualified for measurement.
Rotate the AM1 until free and remove.
5 Re-attachment of AM1 to shank
Locate the AM1 against the shank and rotate until engaged. Tighten the yaw adjustment screw.
AM2 adjustment module
The AM2 adjustment module provides quick and accurate angular alignment of the PH10MQ PLUS motorised probe head with the axes of the CMM and/or the autochange rack.
The AM2 consists of an adjuster plate, which is attached to the quill of the CMM, and a set of adjusters, fitted to the flange of the head.
The head is fixed to the adjuster plate by a pair of captive screws.
The AM2 provides a highly repeatable mounting, allowing a head to be removed and replaced without the need for further adjustment.
Because all adjustable parts remain with the head on removal, more than one head can be set up for use on the same machine, the time taken to exchange heads being minimal.
NOTE: The AM2 does not provide overtravel protection.
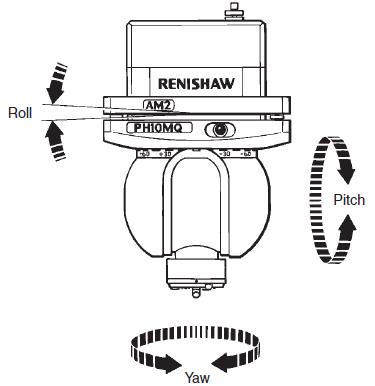
A special tool is supplied (A-1036-0010), consisting of a concentric hexagon key and socket spanner. This should be located on the adjusters and locknuts recessed into the face of the head mounting flange.
NOTE: Springs are fitted under the adjuster locknuts to provide some pre-load during set up.
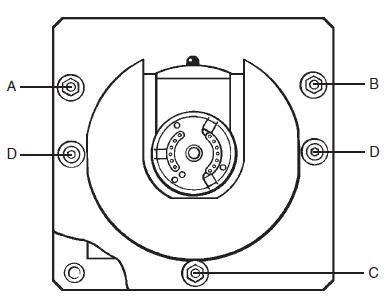
The adjustment procedure is as follows:
1 Slacken the locknut slightly using the outer part of the tool.
2 Set the adjuster using the inner part of the tool.
3 While holding the adjuster stationary, tighten the locknut.
Roll adjustment
Alterations of up to ±1° are possible using the right hand adjuster B (this will introduce a small pitch error).
Pitch adjustment
Alterations of up to ±1° are possible using the rear adjuster C.
Yaw adjustment
Alterations of up to ±1° are possible using the left hand adjuster A.
NOTES: As settings are changed, the tension on the two securing screws (D) may have to be altered. Always check that all three adjuster balls are in firm contact with their seatings.
Fully tighten the securing screws when adjustments are complete.
Head adjustment limits
See 'Autojoint section' for PH6M, PH10M PLUS and PH10MQ PLUS adjustment.
1 Set the head to the correct angle for docking into the ACR1.
2 Enable the rack probe for the alignment process by setting the system into datum mode 2 using the following procedure:
i) Manually hold the port lid open, and press the reset switch on the ACC2-3 front panel. The system is now in datum mode 1.
ii) Allow the lid to close. The system is now in datum mode 2.
3 Using either the alignment stylus or the datum stylus, probe the flat face of the autojoint, not the rollers or contacts.
Alignment stylus and datum stylus:
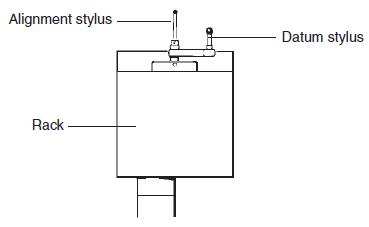
The run-out over the autojoint between points A and B should be less than 20 µm (0.0008 in), otherwise adjust the roll using the AM1 or AM2.
Testing for roll adjustment:
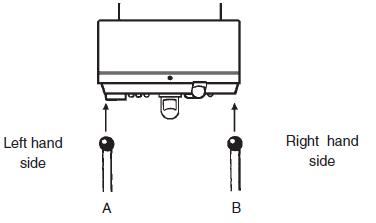
4 Using either the alignment stylus or the datum stylus, probe the flat face of the autojoint. Check that the run-out across the autojoint between points C and D is less than 20 µm (0.0008 in), otherwise adjust the pitch using the AM1 or AM2.
Testing for pitch adjustment:
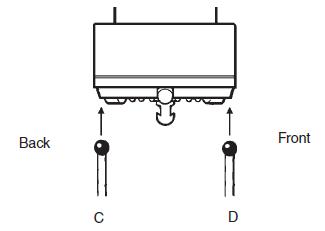
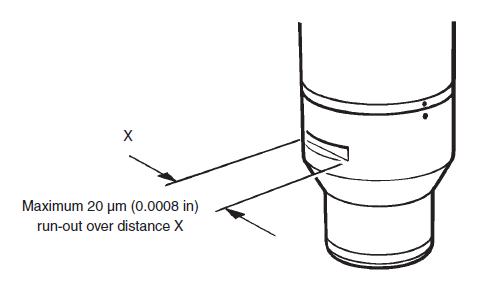
5 Fit an adaptor or probe with integral autojoint to the head autojoint. Using the alignment stylus, check that the run-out along the slot (X) is less than 20 µm (0.0008 in), otherwise adjust the yaw using the AM1 or AM2.
Testing for yaw adjustment:
