Strain-gauge machine-tool probe has the right touch for form measurement of 5-axis aerospace parts
As an aerospace stretch-forming specialist, there's hardly a part or a die in Triumph's shop that is not sporting a parabolic, compound curved or cone shape.
Rapid, precise measurement of machining work on these parts – while still fixtured on the machine tool – is a core skill the company's CAD/CAM department developed and refined to facilitate lean manufacturing. But it took an RMP600 strain-gauge probe to bring the refined “touch” needed for consistent, high-accuracy measurement of small hole diameters, contours and geometric tolerances, to name a few. With no lobing (i.e. true 3-dimensional triggering characteristic) and a repeatability of 0.25 μm (0.00001”), the strain-gauge probe delivers high accuracy when triggered from any direction, after a one-time calibration routine.
The RMP600, combined with Renishaw's OMV software, gives the company's Zimmerman CNC 5-axis portal mill CMM-like capability, allowing complex parts to be “bought off” the machine with measurement results that routinely come within 0.025 mm (0.001”) when double-checked with other devices. As a result, offline checks of work on a true CMM have been essentially eliminated, saving the company many hours of production delays, potential damage, and accuracy problems that arise when moving and re-fixturing high-value parts.
Triumph Fabrications' core capability is stretch forming of sheet, extruded, rolled shape and light plate metals for the aerospace industry. The company's press capacity ranges from 10 to 750 tonnes, with the ability to stretch-form reverse forms using bulldozer attachments of 150 and 400 tons on its Cyril Bath presses. The company also has unique stretch forming capabilities to support complex single-plane and multi-plane forming of a variety of metals.

Triumph Fabrications' core capability is stretch forming of sheet, extruded, rolled shape and light plate metals for the aerospace industry. The company's press capacity ranges from 10 to 750 tonnes, with the ability to stretch-form reverse forms using bulldozer attachments of 150 and 400 tons on its Cyril Bath presses. The company also has unique stretch forming capabilities to support complex single-plane and multi-plane forming of a variety of metals.
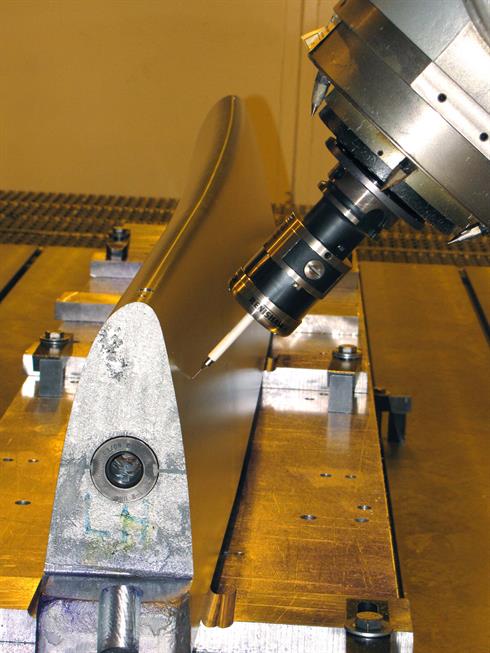
CAD/CAM Department Manager Gary Medlock says on-machine probing is vital to the company's goal to reduce cycle time, eliminate rework and reduce errors that can creep in from multiple fixturings of a part. “We prefer to measure as soon as we cut, rather than move the part to a CMM,” he said. “These are high-value parts to begin with, and we're adding value with each operation on the Zimmerman. On parts such as the forming die for a leading edge (shown in accompanying photos) our alternatives would be to lose nearly a day to tear down, measure, and re-setup the part; or finish the part completely, then inspect, and hope no rework is needed. In-process measurement confirms that each phase of the work meets spec before we put more value in the part.”
More typically, parts processed on the Zimmerman mill are formed sheet metal, 0.635 mm (0.025”) to 3.18 mm (0.125”) thick, that require machined holes and cutouts. These parts are vacuum fixtured. Holes of 2.5 mm (0.098”) to 9.5 mm (0.375”) – typical of aircraft applications – are drilled and reamed to accuracies of 0.05 mm (0.002”), with true position tolerances of .30 mm (0.012”) to 0.71 mm (0.028”). “We measure hole size and true position with the RMP600 probe, using a 1 mm (0.039”) tungsten or stainless steel stylus, 50 mm (1.97”) extension, and the two-touch probing method,” Medlock explains. “We prefer the tungsten ball for the ability to reach deep into a hole. If you are careful about orientation, you can measure just about anything with this ball. The 50 mm extension on an RMP600 probe causes no loss of accuracy, keeps the probe at a distance from the workpiece to minimize crash potential, and is cheaper to replace if there is a collision. We use two-touch probing because we have calibrated at the same speed we're using in the software, so the timing and angles are all established.”
Machine calibration is one of the keys to Triumph's success with, and confidence in, its probing results. “We calibrate the machine once a year with a laser and ball bar unless there's a wreck,” Medlock says. “We also have a small calibration sphere on the machine that we calibrate with once a week, rotating the machine through a known set of angles and touching the sphere with the probe. These results are plotted on a histogram, with data going back two years, so it's easy to see any trend developing. In addition, we have a traceable artifact with cone, sphere, slots and other features that we probe whenever there's a change to any component of our QC program.”
Triumph has two Zimmerman portal mills. The newer FZ-30 model built in 2008 is equipped with a Siemens 840D CNC. This particular machine has a 6 x 2.8 x 1.5 m (236” x 110” x 59”) X-Y-Z linear axis range, 110° A-axis, and 360° C-axis. Its spindle produces a maximum of 40 kW power and 48 Nm torque, with a top speed of 25,000 rpm. The plant itself is climate controlled. “This machine has a volumetric accuracy of 0.1 mm (0.004”), and for a large, well used machine tool, this compares very well with typical CMM accuracy,” Medlock explains.
Among the RMP600's superior capabilities, we have proved that we can measure true diameter of smaller holes, down to (0.098”) using a 1 mm stylus.
Triumph Fabrications (UK)
“Our alternative without the probe would be to take parts to the CMM room, measure them, then return and setup again,” Medlock says. “We'd have to add a checking groove or other feature to aid in making sure each setup is identical to the first, which means more cost in the part, not to mention a lost day for the entire inspection cycle to be completed.
These delays, and the uncertainty that comes with each new setup, are simply unacceptable in a lean operation. On average, our probing cycle is about equal to the machining cycle, but this is a very broad average and some parts inspect much quicker, depending on the number of features. When probing holes, for example, we average about 8 seconds each.”
The other key to Triumph's success is programming the model and geometry. “All the features must be on the part if you want things to run properly,” Medlock stresses. “We usually start with a STEP file that's imported into the OMV software to create the probing program offline. The software simulates the probing routine for collision detection and includes an ‘auto orient' function that allows the probe to be automatically oriented into a suitable measuring position, without requiring manual input of the required angle. You can measure features many ways – for example, a hole can be measured as a circle or cylinder.”
The probing program runs on the CNC to collect the measurement data, which is then evaluated offline in OMV software with CMM-type algorithms. The software compares the measurement data with the map/model file and produces graphical and numerical reports. The software reports on the deviations from the nominal, and will plot a graph to show the ranges.
A GD&T wizard in the OMV software leads programmers through the process of creating standardized report elements based on internationally recognized symbols, allowing comparison of measurement results from the machine to the manufacturing drawing. “We currently use perpendicularity, angularity, surface profile and true position,” Medlock adds.
Unlike a conventional machine tool probe, the strain-gauge-based RMP600 does not have to be calibrated for each vector, which saves significant cycle time in a 5-axis environment. “We do measure from all vectors, because it's a 5-axis application,” Medlock explains. “Because of the strain gauge triggering system in the RMP600 we get a good reading – the same reading – no matter what direction we touch the stylus from, which is perfect in a 5-axis world. When you do 5-axis work, the probe is used in some strange orientations, and the ball might be touched from any practical direction. We've confirmed that when we measure something with the RMP600, we'll get the same identical readings if we have to re-measure. Among the RMP600's superior capabilities, we have proved that we can measure true diameter of smaller holes, down to (0.098”) using a 1 mm stylus.”The RMP600 is fundamentally different from conventional machine tool probes in that its patented RENGAGE™ sensing mechanism eliminates lobing, an error inherent to all conventional machine tool probes. If the lobing is excessive and high enough to impact measurement accuracy, users must compensate by calibrating the probe along each measurement vector. This requires a complex calibration cycle and management of numerous probe offsets.
The RMP600 eliminates this. Strain gauges measure the contact force applied to the stylus and generate a trigger once the strain threshold is exceeded. This results in low trigger forces, less stylus bending, sub micron repeatability (0.25 μm 2σ), no lobing and a true 3-dimensional triggering characteristic. The RMP600 delivers significantly higher metrology performance, especially on 3D surfaces where many sensing directions are used, or in setup, when approach vectors to the workpiece may not be known. Logic inside the probe eliminates unexpected triggers resulting from shock and vibration by determining whether the strains seen at the gauges are caused by contact with the part surface or a random event.
“It's critical to keep in mind that, in the end, the probe is only as accurate as the machine,” Medlock stresses. “With our knowledge of this machine's capabilities, condition and calibration history, we believe an inspection on this machine is equal to a CMM inspection. The machine is tested and calibrated to essentially the same requirements as our CMMs, and easily capable of producing part profile accuracies of 0.38 mm (0.015”). We can verify our metrology performance by probing a known artefact which has all the features we would encounter on our parts. Because of the high accuracy of this machine and its 5-axis capability, the strain-gauge probe has proven to be a better match for our measurement requirements. Periodic double checks against other measurement devices rarely show deviations greater than a thousandth of an inch, giving us a high level of confidence and operational efficiency.”

