Navigation
SP80 / SP80H scanning probe system
SP80 and SP80H quill-mounted scanning probes
 Ultra-high accuracy measurement, provided by digital scale and readheads - system resolution of 0.02 µm (79 µin)
- Long stylus carrying capability for access to deep features - up to 1000 mm (39.4 in) and 500 g (17.64 oz) mass on SP80
- Unbalanced stylus configurations do not require counterbalancing
- SP80H variant mounts to horizontal quill - styli up to 500 mm (7.87 in) long and 500 g (17.64 oz) mass
- Isolated optical metrology for direct accurate measurement of stylus deflection
- Low inertia mechanism for excellent dynamic response
- Passive scanning probe with no motors, giving improved thermal stability and reliability
- Bump-stop crash protection in the Z-axis, together with a detachable stylus holder for XY crash protection
- Adaptor plates enable rapid interchange between SP80 and PH10MQ PLUS motorised head
- Kinematic stylus changing for repeatable relocation of the optimum stylus configuration - removes the need for requalification
SP80 with SH80
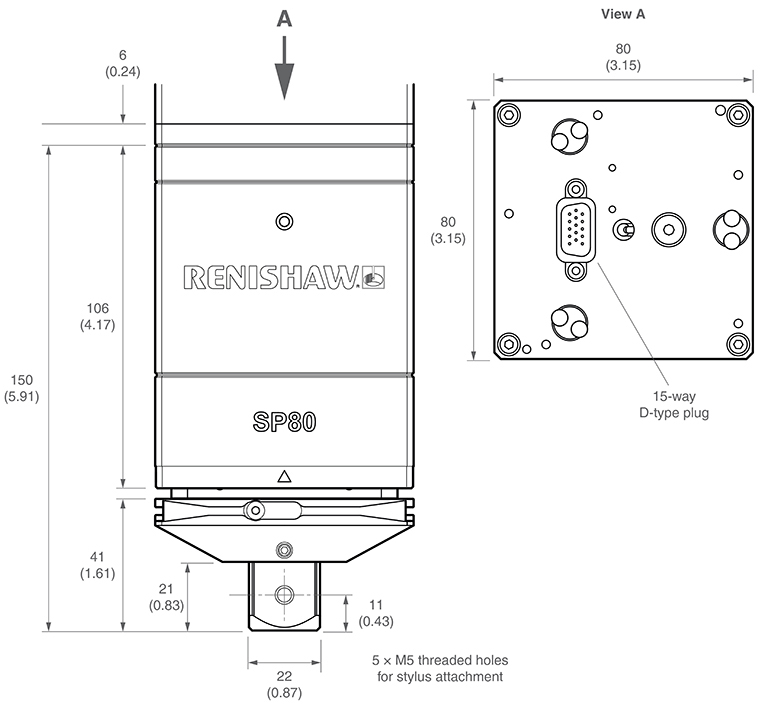
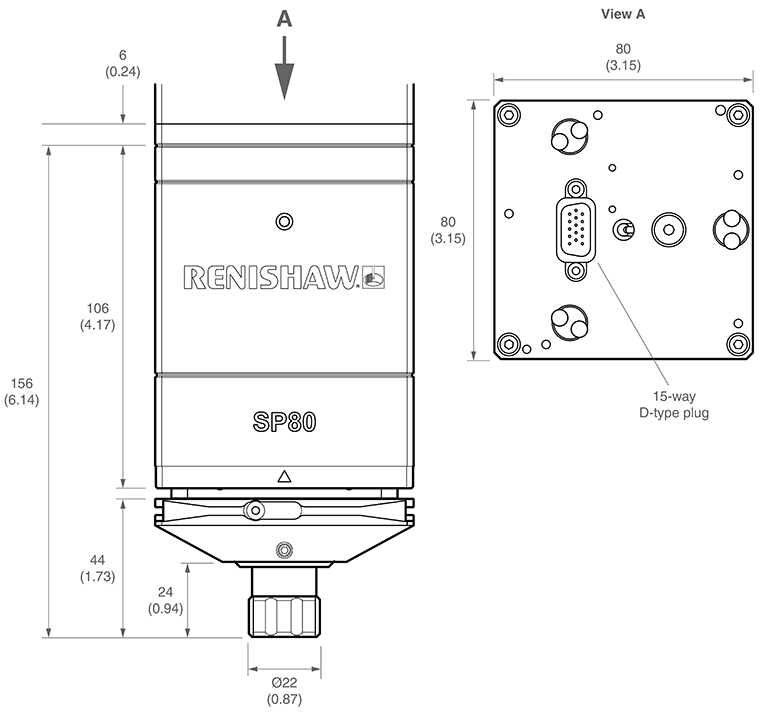
SP80 with SH80K
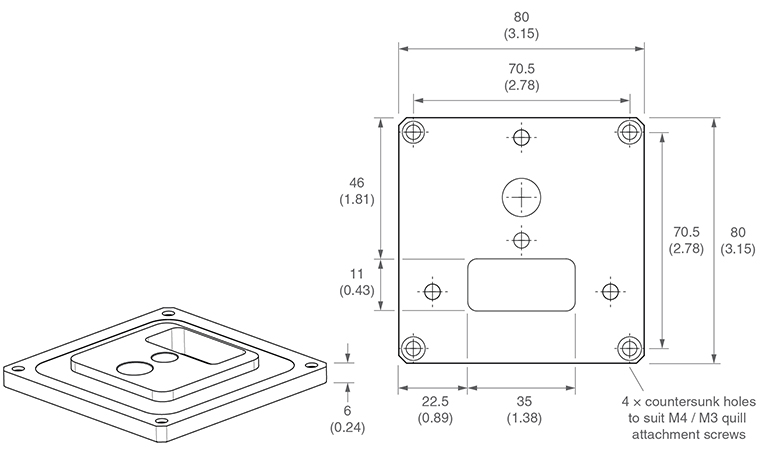
KM80
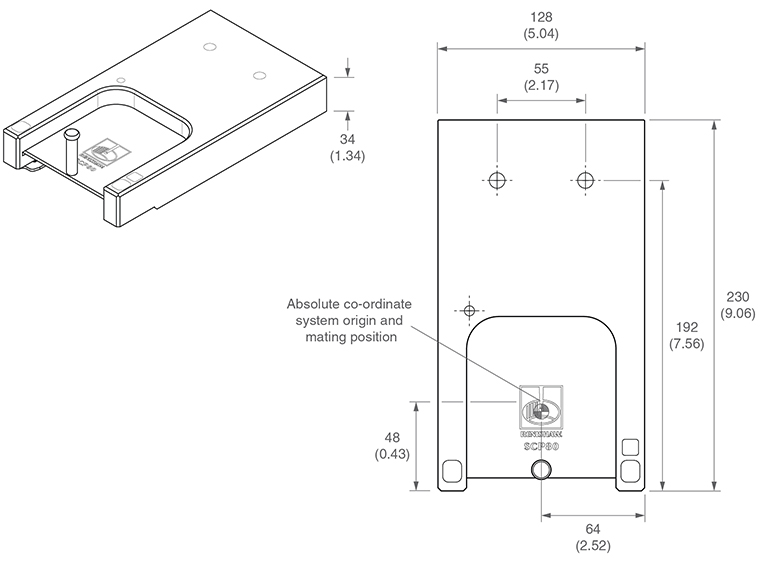
SCP80 / SCP80V
IU80
NOTE: Dimensions in mm (in).
SP80 probe kit

| Key | Description |
| 1 | KM80 kinematic quill mount |
| 2 | SP80 probe body |
| 3 | SH80 stylus holder |
| 4 | SH80K stylus holder |
| 5 | Stylus holder removal tool |
Isolated optical metrology system
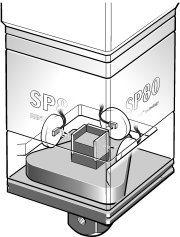
- Readheads for each axis are fitted to the body of the probe
- Light is reflected from the moving cube onto the readhead
- System measures deflection of the whole mechanism
- Detects sources of variable error such as thermal and dynamic effects
- Any inter-axis error caused by arc motion of parallel acting springs is directly measured by the sensor system
- System has no moving wire connections
† Probes with displacement sensors mounted to stacked axes suffer from latency under changing inertial loads and cannot detect thermal growth in their mechanisms.
Specification
SP80 probe system
The probe orientation shown below is the orientation used in the SP80 probe product specification.
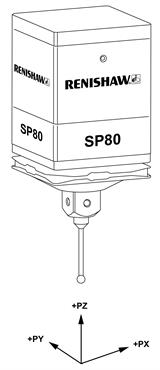
* Where P specifies that it is the probe axis rather than the machine
** Tested on a CMM with specification of 0.48 μm +L/1000 with touch and scanning deflections ≤ 0.5 mm
# Longer stylus lengths may be carried subject to operating conditions - consult Renishaw for application assistance
SP80H probe specification
The probe orientation shown below is the orientation used in the SP80H probe product specification.
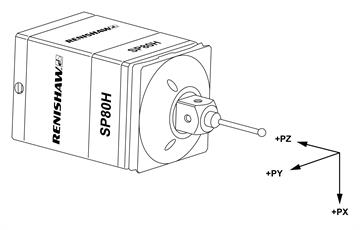
Probe attributes | Ultra-high accuracy scanning probe with three axis measurement (±PX, ±PY, ±PZ)* |
|---|---|
Orientation | Horizontal |
Size | 80 mm × 80 mm (3.15 in × 3.15 in) body, 150 mm (5.91 in) long including SH80 stylus holder |
Quill mounting | KM80: 80 mm × 80 mm quill to kinematic SP80 quill mount (standard) KM6080: 60 mm × 60 mm to 80 mm × 80 mm kinematic SP80 probe mount (option) SM80 : Shank mount and other custom made adaptor plates available - contact your Renishaw supplier for details |
Measurement range | 3-axis measurement: ±1.25 mm (PX)* / ±2.5 mm (PY, PZ)* |
Overtravel range | PY* and PX* protected by breakout of the kinematic joint to the SH80 PZ* has a mechanical bump stop |
Resolution of digital scales | 0.02 μm |
Measurement capability test to ISO10360-2** | Typically <1.0 μm MPETHN with a 60 mm stylus |
Scanning capability test to ISO10360-4** | Typically <1.5 μm MPETHN with a 60 mm stylus Time for scan = 74 s |
Return to zero | Approximately 1% of working deflection |
Spring rate | Approximately 2.5 N/mm (PX)* Approximately 1.6 N/mm (PY, PZ)* |
Stylus carrying capability | Renishaw M5 stylus range Maximum 300 g mass (unbalanced)*** Maximum 500 mm projection # |
Mass | SP80H probe body only: 860 g SH80 stylus holder: 185 g KM80 quill mount: 110 g |
Pull off force of SH80 | <20 N when using SCP80V - otherwise approximately 80 N |
Probe power supply | +9 V to +18 V @ 300 mA maximum dc |
System power supply (including IU80) | +5 V ± 0.25 V @ 1 A maximum dc |
SP80 probe outputs (X, Y, Z) | 1.5 V ± 0.25 V p-p. analogue quadrature signal (nominal 2.5 V zero crossing reference) |
Interfacing options |
|
Change rack system | SP80V mounted to on OEM supplied extension |
** Tested on a CMM with specification of 0.48 μm + L/1000 with touch and scanning deflections ≤ 0.15 mm
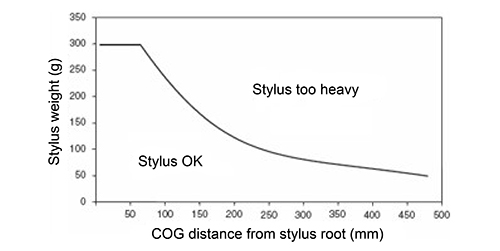
*** Stylus centre of gravity to be within area A of graph
# Longer stylus lengths may be carried subject to operating conditions - consult Renishaw for application assistance
SP80H specification
Stylus carrying capability
Due to the different orientation of the kinematics problems can occur when trying to support heavy styli on SP80H. Failure to reseat properly after the kinematics have been reseated may be observed with styli that have a moment at the stylus root greater than 200 g at 200 mm.
A graph representing a safe working moment range is shown below; this is based upon stylus weight and centre of gravity (COG) distance from the stylus root. It is advised that where possible customers should try and use styli configurations for SP80H that fall within these guidelines.
| Part number | |
SP80 scanning probe kits | |
SP80 kit 1 including 1 SH80, 1 × KM80, 1 × SH80K and 1 × SH80 removal tool | A-2238-0700 |
SP80 kit 2 including 1 × SH80, 1 × KM80, 1 × SH80K, 1 × SH80 removal tool, 3 × SCP80 and 1 × 600 mm MRS kit | A-2238-0732 |
SP80 kit 3 including 1 × SH80, 1 × KM80,1 × SH80K, 1 × SH80 removal tool, 4 × SCP80 and 1 × 600 mm MRS kit | A-2238-0733 |
SP80 kit 4 including 1 × SH80, 1 × KM80, 1 × SH80K, 1 × SH80 removal tool, 5 × SCP80 and 1 × 1000 mm MRS kit | A-2238-0734 |
SP80 kit 5 including 3 × SH80, 1 × KM80,1 × SH80K, 1 × SH80 removal tool, 3 × SCP80 and 1 × 600 mm MRS kit | A-2238-0735 |
SP80 kit 6 including 4 × SH80, 1 × KM80, 1 × SH80K, 1 × SH80 removal tool, 4 × SCP80 and 1 × 600 mm MRS kit | A-2238-0736 |
SP80 kit 7 including 5 × SH80, 1 × KM80, 1 × SH80K, 1 × SH80 removal tool, 5 × SCP80 and 1 × 1000 mm MRS kit | A-2238-0737 |
SP80H scanning probe kits | |
SP80H kit 1 including 1 SH80, 1 × KM80, 1 × SH80K and 1 × SH80 removal tool | A-2238-0419 |
SP80 and SP80H stylus changing accessories | |
SCP80 stylus change port for SP80 (for use with MRS / MRS2 system) | A-2238-0706 |
SCP80V stylus change port for SP80 and SP80H | A-2238-0726 |
SH80 stylus holder for SP80 and SP80H | A-2238-0705 |
SH80K kinematic stylus holder for SP80 and SP80H | A-2238-0430 |
SH80 removal tool for SP80 and SP80H | M-2238-0443 |
SP80 and SP80H interfaces and counter cards | |
IU80 interpolator unit for SP80 and SP80H | A-2238-0720 |
CC6 counter card for SP80 and SP80H (includes PL158 cable) | A-4068-0400 |
SP80 accessories | |
SM80 shank mount plate for SP80 and SP80H | A-2238-0704 |
KM80 standard kinematic mount for SP80 and SP80H | A-2238-0703 |
KM6080 60 mm to 80 mm quill adaptor for SP80 and SP80H | A-2238-0020 |
PHA80 - SP80 to KM1 quick change adaptor | A-2238-0752 |


