Navigation
TP7 specification
The following data is derived from test rig measurements and may not represent the performance achievable on a CMM. Please contact your CMM supplier for overall system accuracy information.
TP7M
Sense directions | 6-way: ±X ±Y Z |
3D accuracy (test to ISO 10360 Pt 2)* | N/A |
Unidirectional repeatability (2σ μm) | |
Trigger level 1: | 0.25 μm (0.00001 in) |
Trigger level 2: | 0.25 μm (0.00001 in) |
XY (2D) form measurement deviation | |
Trigger level 1: | ±0.25 μm (0.00001 in) |
Trigger level 2: | ±0.5 μm (0.00002 in) |
XYZ (3D) form measurement deviation | |
Trigger level 1: | ±0.5 μm (0.00002 in) |
Trigger level 2: | ±1 μm (0.00004 in) |
Trigger force (at stylus tip) | |
XY plane: | 0.02 N |
Z axis: | 0.15 N |
Overtravel force | |
XY plane: | 0.78 N |
Z axis: | 11.75 N |
Weight | 85 g (3 oz) |
Maximum extension (on a PH10 series head) | 200 mm (7.87 in) |
Maximum recommended stylus length (M4 styli range) | 150 mm (5.9 in) steel |
Mounting method | Multi-wired autojoint |
Suitable interface | PI 7-3 |
Automatic probe changing | Autochange rack |
Operating temperature range | 10 °C - 40 °C (50 °F - 104 °F) |
TP7M EP (enhanced performance)
Sense directions | 6-way: ±X ±Y Z |
3D accuracy (test to ISO 10360 Pt 2)* | <0.6 μm (0.000024 in) |
Unidirectional repeatability (2σ μm) | |
Trigger level 1: | 0.25 μm (0.00001 in) |
Trigger level 2: | 0.25 μm (0.00001 in) |
XY (2D) form measurement deviation | |
Trigger level 1: | ±0.25 μm (0.00001 in) |
Trigger level 2: | ±0.5 μm (0.00002 in) |
XYZ (3D) form measurement deviation | |
Trigger level 1: | ±0.5 μm (0.00002 in) |
Trigger level 2: | ±1 μm (0.00004 in) |
Trigger force (at stylus tip) | |
XY plane: | 0.02 N |
Z axis: | 0.15 N |
Overtravel force | |
XY plane: | 0.78 N |
Z axis: | 11.75 N |
Weight | 85 g (3 oz) |
Maximum extension (on a PH10 series head) | 200 mm (7.87 in) |
Maximum recommended stylus length (M4 styli range) | 50 mm (5.9 in) steel |
Mounting method | Multi-wired autojoint |
Suitable interface | PI 7-3 |
Automatic probe changing | Autochange rack |
Operating temperature range | 10 °C - 40 °C (50 °F - 104 °F) |
The data above applies for test conditions as follows:
- Stylus length 50 mm (1.97 in)
- Stylus velocity 240 mm / min (1.57 ft / min)
3D measuring performance
To standard ASME B89.4.1 – 1997 for point to point measurement.
Typically, the 3D measuring performance (spherical characteristic) is better than 2 μm. This means that no matter from which direction the probe triggers, the maximum error will be less than 2 μm when standard qualification techniques have been employed using styli up to 50 mm long.The 3D measuring performance of the probe considers the following sources of probe error:
- Unidirectional repeatability
- XYZ pretravel variation
- Stylus ball sphericity
The table below only applies to TP7M with the additional styli:
Stylus configuration | Performance parameters | Sensitivity setting - level 1 | Sensitivity setting - level 2 | |
|---|---|---|---|---|
Straight | 100 mm long | Unidirectional repeatability | 0.5 μm | 0.5 μm |
2D form measurement deviation | ±1 μm | ±2 μm | ||
3D form measurement deviation | ±1.5 μm | ±3.5 μm | ||
150 mm long | Unidirectional repeatability | 0.7 μm | 0.7 μm | |
2D form measurement deviation | ±1.5 μm | ±2.5 μm | ||
3D form measurement deviation | ±2.5 μm | ±6 μm | ||
Offset | 5 mm long, | 2D form measurement deviation | ±0.4 μm | ±0.8 μm |
3D form measurement deviation | ±0.5 μm | ±1 μm | ||
50 mm long, | 2D form measurement deviation | ±0.7 μm | ±1.3 μm | |
3D form measurement deviation | ±1 μm | ±1.8 μm |
Typical performance data for TP7M probe
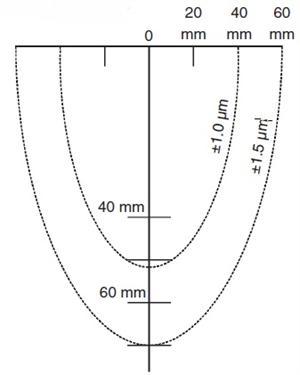
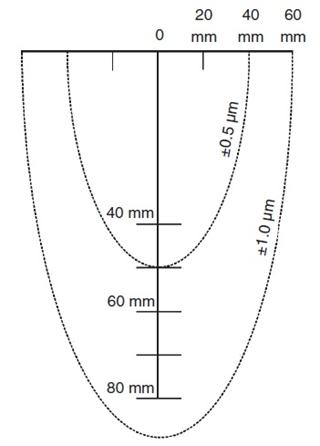
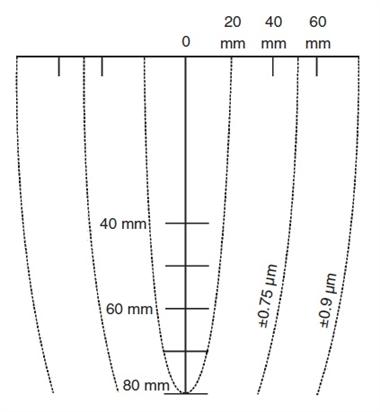
The following information provides examples of the expected measuring performance of the TP7M when using M2, M3 and M4 styli in accordance with the stylus selection guidelines given earlier in this document.
In all cases, the ‘contour' lines show probe performance figures using straight or right-angled stylus configurations.
For the configuration shown, where M2-M3-M4 adaptors and M2 styli are used, the expected measuring performance from the probing system would be within ± 1.5 μm.
TP7M using suitable M2, M3 and M4 adaptors and M2 styli

TP7M using suitable M3 and M4 adaptors and M3 styli

TP7M using M4 styli
