MCG systems
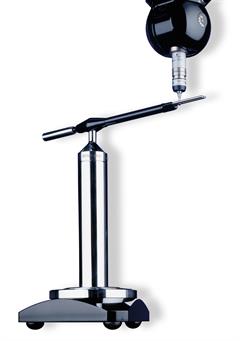
Machine checking gauge (MCG) for monitoring the volumetric measuring performance of your CMM.

Most CMM's are typically subjected to an annual service and re-calibration by the original equipment manufacturer (OEM) or independent calibration service. Testing is often carried out to a defined procedure laid down in a recognised standard such as ISO, ASME, or VDI / VDE. These tests require the use of fixed length ball-ended bars or step gauges and laser measurement systems (e.g.; Renishaw XL-80 laser). The measurement data can then be used to modify the CMM controller's electronic error map to restore it to within accuracy specifications. This well recognised procedure is essential but can be time consuming and costly.
Many end users want a simpler method of monitoring accuracy at regular intervals between these checks or after a collision. Using the Renishaw MCG, they are able to carry out a (typically) 10 - 20 minute interim verification of volumetric accuracy to ISO10360-2. The results give assurance that measurements taken on the CMM are accurate, or give conclusive proof that servicing or re-calibration work is needed. The process is quick and cost effective and a range of pillar heights and arm lengths mean that volumetric accuracy can be checked on both large and small CMMs.

The probe's stylus slots into the end of what is, in effect, a reference 'ball' bar. The probe carries the bar with it around a spherical path, and radial readings are taken at different positions. The range of these readings indicates the volumetric measuring performance of the CMM. Repetition of a sequence of readings checks the system for repeatability.
Volumetric measuring performance is the maximum error between any two points in any plane, over any distance within the full measuring volume.
Special calibrated stylus can be used with TP1, TP2, TP20, TP6A, with suitable adaptors.
MCG kits
Gauge | Description | Machine suitability | Total gauge error | Arms size | Dimensions up to |
| MCG1 | Small checking gauge kit | Up to 1 m³ (35.315 ft³) | ±0.5 µm (±0.00002 in) | Up to 380 mm | X 537 Z 537 |
| MCG2 | Comprehensive checking gauge kit | 1 m³ (35 ft³) | ±0.5 µm (±0.00002 in) | Up to 685 mm | X 986 Z 986 |
MCG tools analyzing spreadsheet

The MCG tools spreadsheet provides all the necessary tools for you to create a part program that can be ran on your compatible DMIS metrology software.
MCG tools can then import a results file created during the program run and report various metrology characteristics of your CMM. These results correlate directly with the maximum error between two points and determine the volumetric accuracy of your CMM.
Over time the volumetric accuracy of your CMM will change and the MCG tools spreadsheet maintains a historical overview where you can spot changes through trend analysis.
The MCG and MCG tools is a powerful reporting tool, not a calibration tool. The greatest benefit of these products is to report the current state of your CMM allowing you to perform preventative maintenance before problems arise.
Click here, for online help.

